
You can now implement this feature by following simple tutorial as always.
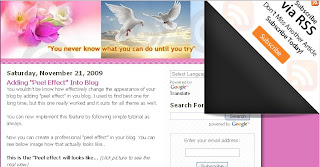
Now you can create a professional "peel effect" in your blog. You can see below image how that actually looks like..
This is the "Peel effect will looks like...
Go to your blogger Dashboard, click Layout tab and then click "Edit HTML" tab.
Insert the following codes under <head> section of your template
<style type='text/css'>
img { behavior: url(iepngfix.htc) }
#pageflip {
position: relative;
right: 0; top: 0;
float: right;
}
#pageflip img {
width: 50px; height: 52px;
z-index: 99;
position: absolute;
right: 0; top: 0;
-ms-interpolation-mode: bicubic;
}
#pageflip .msg_block {
width: 50px; height: 50px;
overflow: hidden;
position: absolute;
right: 0; top: 0;
background: url(http://www.wallheaven.com/subscribe.png) no-repeat right top;
}
</style>
<script src='http://code.jquery.com/jquery-latest.js' type='text/javascript'/>
<script type='text/javascript'>
$(document).ready(function(){
//Page Flip on hover
$("#pageflip").hover(function() {
$("#pageflip img , .msg_block").stop()
.animate({
width: '307px',
height: '319px'
}, 500);
} , function() {
$("#pageflip img").stop()
.animate({
width: '50px',
height: '52px'
}, 220);
$(".msg_block").stop()
.animate({
width: '50px',
height: '50px'
}, 200);
});
});
</script>
After you implemented above codes into your template, you need to add another code into template at <body> section. <div id='pageflip'>
<a href='http://feeds.feedburner.com/blogspot/nPSr'><img alt='' src='http://www.wallheaven.com/page_flip.png'/></a>
<div class='msg_block'></div>
</div>Finally, save your template and peel effect will appear in the top right corner section of your template


0 comments:
Post a Comment